Java FullStack Spring boot & React app: Backend REST API / 3 - Securing the REST API with Spring Security & JWT (a)
Welcome back!
In the previous tutorial, we have set up the CRUD operations in our REST API. In this tutorial we're going to secure the REST API using Spring security and Json Web Token a.k.a JWT. Reminder : this tutorial is part of series covering a full-stack app development.
What we'll cover here
- How to customize Spring security to fetch users from database
- How to implement JWT token management in Spring boot REST API
- How to expose a REST POST API /login to generate a JWT token
User entity and repository
We are going to create an enum class to manage static roles for simplicity purpose. Let's create a package: security.model, then, in the model package create ERole.java class as follow:
package com.codeurinfo.easytransapi.security.model;

public enum ERole {
  ROLE_ADMIN,
  ROLE_USER,
}
Here, we have two roles: ROLE_ADMIN for administrator role and ROLE_USER for a simple user role. you can add more roles as needed.
Once roles class coded, we gonna create a custom user class in the same package as ERole.java, we'll annotated it as an entity.
package com.codeurinfo.easytransapi.security.model;


import java.util.Objects;
import java.util.Set;

import javax.persistence.ElementCollection;
import javax.persistence.Entity;
import javax.persistence.EnumType;
import javax.persistence.Enumerated;
import javax.persistence.GeneratedValue;
import javax.persistence.GenerationType;
import javax.persistence.Id;
import javax.persistence.Table;

@Entity
@Table(name = "users")
public class User {

  @Id
  @GeneratedValue(strategy = GenerationType.AUTO)
  private Long id;

  private String userName;
  private String password;
  private String name;
  @ElementCollection (targetClass = ERole.class)
  @Enumerated(EnumType.STRING)
  private Set<ERole> roles;

  public User() {}

  public User(
    String userName,
    String password,
    String name,
    Set<ERole> roles
  ) {
    this.userName = userName;
    this.password = password;
    this.name = name;
    this.roles = roles;
  }
/**
   * getters and setters
   */
@ElementCollection is used to map the ERole.java enum list which is not an entity while @Enumerated(EnumType.STRING), especially ( EnumType.STRING ) tells JPA to persist Enum names instead of their index numbers in the DB.
Now, let's create the repository to manage the User.class in a new package : security.repository .
package com.codeurinfo.easytransapi.security.repository;

import com.codeurinfo.easytransapi.security.model.User;

import java.util.Optional;
import org.springframework.data.jpa.repository.JpaRepository;
import org.springframework.data.rest.core.annotation.RepositoryRestResource;

@RepositoryRestResource
public interface UserRepository extends JpaRepository<User, Long> {
  Optional<User> findByUserName(String userName);
}
findByUserName is a query method to fetch user by a given userName. You can read more about Spring Data JPA query methods here.
User entity is now ready to be used, in the following sections, we are going to implement very interesting spring security features.
Dependency management
Open the pom.xml file and add following dependencies:
<!-- Spring security -->
        <dependency>
            <groupId>org.springframework.boot</groupId>
            <artifactId>spring-boot-starter-security</artifactId>
        </dependency>

        <!-- JWT  -->
        <dependency>
            <groupId>io.jsonwebtoken</groupId>
            <artifactId>jjwt</artifactId>
            <version>0.9.1</version>
        </dependency>

        <!-- very important while using java 11 and above -->
        <dependency>
            <groupId>javax.xml.bind</groupId>
            <artifactId>jaxb-api</artifactId>
            <version>2.3.1</version>
        </dependency>
Customize Spring security to fetch user from DB (H2 database)
In order to use custom user management in Spring Security, we must first implement Spring security core UserDetails interface to map our custom User detail class to Spring security User class and then implement Spring security core UserDetailsService interface so that Spring can query users from the DB.
Within security package, create a class named UserDetailsImpl.java :
package com.codeurinfo.easytransapi.security;

import com.codeurinfo.easytransapi.security.model.User;
import com.fasterxml.jackson.annotation.JsonIgnore;
import java.util.Collection;
import java.util.List;
import java.util.Objects;
import java.util.stream.Collectors;
import org.springframework.security.core.GrantedAuthority;
import org.springframework.security.core.authority.SimpleGrantedAuthority;
import org.springframework.security.core.userdetails.UserDetails;

public class UserDetailsImpl implements UserDetails {

  private Long id;

  private String username;

  @JsonIgnore
  private String password;

  private Collection<? extends GrantedAuthority> authorities;

  public UserDetailsImpl(
    Long id,
    String username,
    String password,
    Collection<? extends GrantedAuthority> authorities
  ) {
    this.id = id;
    this.username = username;
    this.password = password;
    this.authorities = authorities;
  }

  /**
   * Static method to expose UserDetailsImpl object created by given user
   * @param user
   * @return UserDetailsImpl object
   */
  public static UserDetailsImpl build(User user) {
    // Map user roles list to Spring Security GrantedAuthority list
    List<GrantedAuthority> authorities = List
      .copyOf(user.getRoles())
      .stream()
      .map(role -> new SimpleGrantedAuthority(role.name()))
      .collect(Collectors.toList());

    return new UserDetailsImpl(
      user.getId(),
      user.getUserName(),
      user.getPassword(),
      authorities
    );
  }

  @Override
  public Collection<? extends GrantedAuthority> getAuthorities() {
    return authorities;
  }

  public Long getId() {
    return id;
  }

  @Override
  public String getPassword() {
    return password;
  }

  @Override
  public String getUsername() {
    return username;
  }

  @Override
  public boolean isAccountNonExpired() {
    return true;
  }

  @Override
  public boolean isAccountNonLocked() {
    return true;
  }

  @Override
  public boolean isCredentialsNonExpired() {
    return true;
  }

  @Override
  public boolean isEnabled() {
    return true;
  }

  @Override
  public boolean equals(Object o) {
    if (this == o) return true;
    if (o == null || getClass() != o.getClass()) return false;
    UserDetailsImpl user = (UserDetailsImpl) o;
    return Objects.equals(id, user.id);
  }
}
Now, we can implement the UserDetailsService. Create UserDetailsServiceImpl.java class in security package as follow:
package com.codeurinfo.easytransapi.security;

import com.codeurinfo.easytransapi.security.model.User;
import com.codeurinfo.easytransapi.security.repository.UserRepository;
import java.util.ArrayList;

import javax.transaction.Transactional;

import org.springframework.beans.factory.annotation.Autowired;
import org.springframework.security.core.userdetails.UserDetails;
import org.springframework.security.core.userdetails.UserDetailsService;
import org.springframework.stereotype.Service;

@Service
public class UserDetailsServiceImpl implements UserDetailsService {

  @Autowired
  private UserRepository userRepository;

  /**
   * Override this method to fetch user by userName from th db
   * using the UserRepository
   * @Transactional is used to manage User & roles collection lazy loading
   */
  @Override
  @Transactional
  public UserDetails loadUserByUsername(String userName) {

    User user = userRepository.findByUserName(userName).orElse(null);

    return UserDetailsImpl.build(user);
  }
}
Create a JWT utility class
In the security package, create a package util and create JwtUtil.class.
package com.codeurinfo.easytransapi.security.util;

import com.codeurinfo.easytransapi.security.UserDetailsImpl;
import io.jsonwebtoken.Claims;
import io.jsonwebtoken.Jwts;
import io.jsonwebtoken.SignatureAlgorithm;
import java.util.Date;
import java.util.HashMap;
import java.util.Map;
import java.util.function.Function;
import org.springframework.stereotype.Service;

@Service
public class JwtUtil {

  // Give a secret key for JWT token generating & validation
  private String SECRET_KEY = "secret";

  // get username from the provided token
  public String extractUsername(String token) {
    return extractClaim(token, Claims::getSubject);
  }

  //get the token expiration time
  public Date extractExpiration(String token) {
    return extractClaim(token, Claims::getExpiration);
  }

  // get token infos
  public <T> T extractClaim(String token, Function<Claims, T> claimsResolver) {
    final Claims claims = extractAllClaims(token);
    return claimsResolver.apply(claims);
  }

  private Claims extractAllClaims(String token) {
    return Jwts
      .parser()
      .setSigningKey(SECRET_KEY)
      .parseClaimsJws(token)
      .getBody();
  }

  private Boolean isTokenExpired(String token) {
    return extractExpiration(token).before(new Date());
  }

  public String generateToken(UserDetailsImpl userDetails) {
    Map<String, Object> claims = new HashMap<>();
    return createToken(claims, userDetails.getUsername());
  }

  /**
   * Generate a token for the provided subject (username)
   * @param claims
   * @param subject
   */
  private String createToken(Map<String, Object> claims, String subject) {
    return Jwts
      .builder()
      .setClaims(claims)
      .setSubject(subject)
      .setIssuedAt(new Date(System.currentTimeMillis()))
      .setExpiration(new Date(System.currentTimeMillis() + 1000 * 60 * 60 * 10)) //Expiration in 36,000,000 ms (10 hours)
      .signWith(SignatureAlgorithm.HS256, SECRET_KEY) // signing with HS256 algorythm
      .compact();//According to JWS Compact Serialization(https://tools.ietf.org/html/draft-ietf-jose-json-web-signature-41#section-3.1)
      //   compaction of the JWT to a URL-safe string
  }

  /**
   * Validate token
   */
  public Boolean validateToken(String token, UserDetailsImpl userDetails) {
    final String username = extractUsername(token);

    return (
      username.equals(userDetails.getUsername()) && !isTokenExpired(token)
    );
  }
}
Providing a /login REST API POST endpoint
In this section, we'll be coding a controller to expose an authentication endpoint to our REST API.
Let's create AuthenticationRequest.java class in security.model package in order to hold the username and password coming from our REST API consumer's http request payload.
package com.codeurinfo.easytransapi.security.model;

import java.util.Objects;

public class AuthenticationRequest {

  private String userName;
  private String password;

  public AuthenticationRequest() {}

  public AuthenticationRequest(String userName, String password) {
    this.userName = userName;
    this.password = password;
  }

 // Getters and setters

}
Create another class named AuthenticationResponse.java to send the response containing the JWT token to the client.
package com.codeurinfo.easytransapi.security.model;

import java.util.Objects;

public class AuthenticationResponse {

  private String jwt;

  public AuthenticationResponse() {}

  public AuthenticationResponse(String jwt) {
    this.jwt = jwt;
  }

  // getters and setters
To expose a /login endpoint that will accept an AuthenticationRequest object and return an AuthenticationResponse object to the client, let's create AuthController.java class in the security package.
package com.codeurinfo.easytransapi;

import com.codeurinfo.easytransapi.security.UserDetailsImpl;
import com.codeurinfo.easytransapi.security.UserDetailsServiceImpl;
import com.codeurinfo.easytransapi.security.model.AuthenticationRequest;
import com.codeurinfo.easytransapi.security.model.AuthenticationResponse;
import com.codeurinfo.easytransapi.security.repository.UserRepository;
import com.codeurinfo.easytransapi.security.util.JwtUtil;
import org.springframework.beans.factory.annotation.Autowired;
import org.springframework.http.ResponseEntity;
import org.springframework.security.authentication.AuthenticationManager;
import org.springframework.security.authentication.UsernamePasswordAuthenticationToken;
import org.springframework.security.core.Authentication;
import org.springframework.security.core.context.SecurityContextHolder;
import org.springframework.web.bind.annotation.PostMapping;
import org.springframework.web.bind.annotation.RequestBody;
import org.springframework.web.bind.annotation.RestController;

@RestController
public class AuthController {

  @Autowired
  private AuthenticationManager authenticationManager;

  @Autowired
  private UserDetailsServiceImpl userDetailsService;

  @Autowired
  private JwtUtil jwtUtil;

  @PostMapping("/api/auth/login")
  public ResponseEntity createAuthenticationToken(
    @RequestBody AuthenticationRequest request
  )
    throws Exception {
    Authentication authentication = null;
    try {
      // Use AuthenticationManager to verify the provided username/password
      authentication =
        authenticationManager.authenticate(
          new UsernamePasswordAuthenticationToken(
            request.getUserName(),
            request.getPassword()
          )
        );
    } catch (Exception exception) {
      throw new Exception("Incorrect username or password");
    }
    //if username/password valid, put the Authentication created object in the SecurityContextHolder's context
    SecurityContextHolder.getContext().setAuthentication(authentication);

    // Retrieve the user from the UserDetailsServiceImpl
    final UserDetailsImpl userDetails = (UserDetailsImpl) userDetailsService.loadUserByUsername(
      request.getUserName()
    );

    // Generate the token from the JWT util class
    String jwt = jwtUtil.generateToken(userDetails);

    // Send AuthenticationResponse response to client
    return ResponseEntity.ok(new AuthenticationResponse(jwt));
  }
}
We can now create SecurityConfig.java class, a configuration class to extends WebSecurityConfigurerAdapter class.
package com.codeurinfo.easytransapi.security;

import org.springframework.beans.factory.annotation.Autowired;
import org.springframework.context.annotation.Bean;
import org.springframework.security.authentication.AuthenticationManager;
import org.springframework.security.config.annotation.authentication.builders.AuthenticationManagerBuilder;
import org.springframework.security.config.annotation.method.configuration.EnableGlobalMethodSecurity;
import org.springframework.security.config.annotation.web.builders.HttpSecurity;
import org.springframework.security.config.annotation.web.configuration.EnableWebSecurity;
import org.springframework.security.config.annotation.web.configuration.WebSecurityConfigurerAdapter;
import org.springframework.security.config.http.SessionCreationPolicy;
import org.springframework.security.crypto.bcrypt.BCryptPasswordEncoder;
import org.springframework.security.crypto.password.PasswordEncoder;
import org.springframework.security.web.authentication.UsernamePasswordAuthenticationFilter;

@EnableWebSecurity // Enable Spring Security’s web security support
@EnableGlobalMethodSecurity(securedEnabled = true, prePostEnabled = true) //To configure method-level security
public class SecurityConfig extends WebSecurityConfigurerAdapter {

  @Autowired
  private UserDetailsServiceImpl customUserDetailsService;


  @Override
  protected void configure(AuthenticationManagerBuilder auth) throws Exception {
    auth.userDetailsService(customUserDetailsService).passwordEncoder(passwordEncoder());
  }

  @Override
  protected void configure(HttpSecurity http) throws Exception {
    http
      .csrf()
      .disable()
      .authorizeRequests()
      .antMatchers("/api/auth/**").permitAll() // Grant access to every /api/auth based url
      .anyRequest().authenticated() // All other based url wil be allowed if authenticated
      .and()
      .sessionManagement()
      .sessionCreationPolicy(SessionCreationPolicy.STATELESS);//Force server not to never create an HttpSession

  }

  @Override
  @Bean
  public AuthenticationManager authenticationManagerBean() throws Exception {
    return super.authenticationManagerBean();
  }

  @Bean
  public PasswordEncoder passwordEncoder() {
    return new BCryptPasswordEncoder();
  }
}
You can learn more about the SecurityConfig.java class here.
Once more class to code before we can test our API. For simplicity purpose, we'll be preloading users into the database and try to log in with their corresponding cridentials.
Thanks to Spring boot's CommandLineRunner interface, we can create a preload class DatabaseLoader.java like this:
package com.codeurinfo.easytransapi;

import com.codeurinfo.easytransapi.security.model.ERole;
import com.codeurinfo.easytransapi.security.model.User;
import com.codeurinfo.easytransapi.security.repository.UserRepository;
import java.util.Arrays;
import java.util.Set;
import org.springframework.beans.factory.annotation.Autowired;
import org.springframework.boot.CommandLineRunner;
import org.springframework.security.crypto.password.PasswordEncoder;
import org.springframework.stereotype.Component;

@Component
public class DatabaseLoader implements CommandLineRunner {

  @Autowired
  UserRepository userRepository;

  @Autowired
  PasswordEncoder encoder;

  @Override
  public void run(String... args) throws Exception {
    // remember we use PasswordEncoder to configure the AuthenticationManagerBuilder in the SecurityConfig class
    // thus you must encode  pwd using the same encoder (BCryptPasswordEncoder) before persit
    String pwd1 = encoder.encode("will");
    String pwd2 = encoder.encode("user");
    userRepository.save(
      new User(
        "will",
        pwd1,
        "Wilson",
        Set.copyOf(Arrays.asList(ERole.ROLE_ADMIN, ERole.ROLE_USER))
      )
    );
    userRepository.save(
      new User(
        "user",
        pwd2,
        "Adjowa",
        Set.copyOf(Arrays.asList(ERole.ROLE_USER))
      )
    );
  }
}
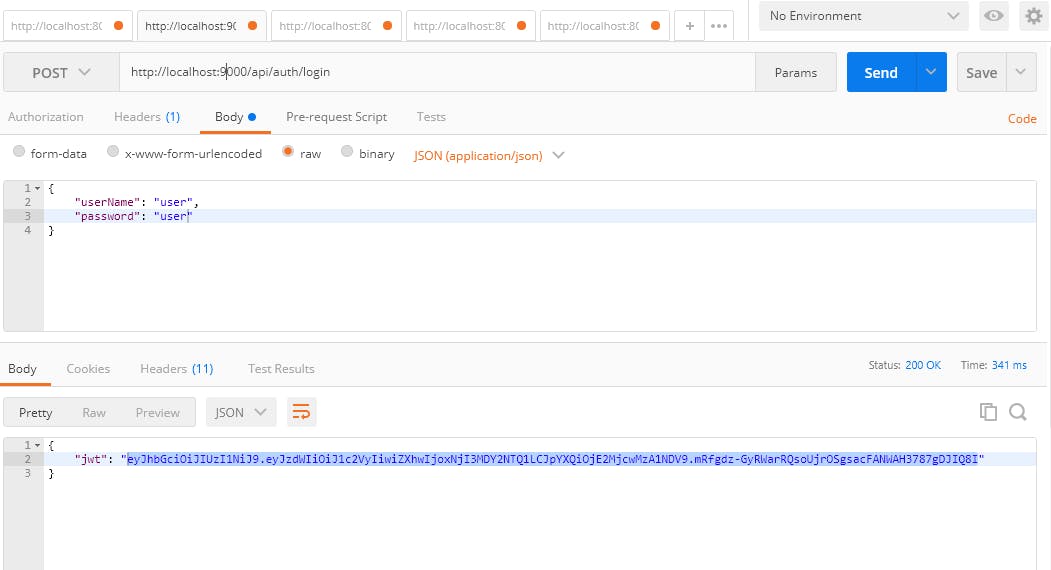
Run the project, go to Postman and make a POST request to this endpoint :
http://localhost:8000/api/auth/login
You must have a result like this:

Voila, through our REST API we can log in once and get a token to use in http request headers for the next 10 hours. In the next tutorial, we'll see how to validate client request header token and how to grant access to endpoints according to users roles.
Hope you learned something new. If so, don't forget to hit the Like button and subscribe to this blog to be up to date with new posts.

